วันพฤหัสบดีที่ 17 ตุลาคม พ.ศ. 2556

Banknote Tutorial !!! ( Idea form Now You See me.)

Banknote Tutorial !!!  
            I got an idea from Now you see me (film). In the scene that a lot of money spread to the sky. I use only Ncloth to do this. and I Think this way is so easy. just create like group of banknote and make it float in the air. and you can get it collide with itself and other passive too.
Let start.
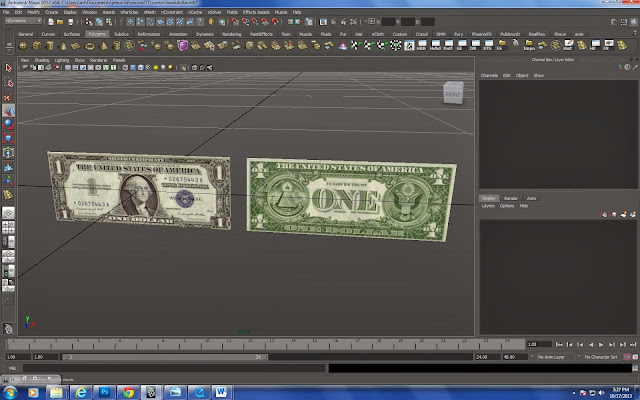
1.create banknote model. And prepare back texture too.

2.duplicate like image.

3. Go to nDynamics tab > nMesh > create nCloth.

4. Open attribute editor > Dynamic Properties >Stretch Resistance to 100( this attribute for your cloth will not stretch so much) >  Lift to 4.00 (it help your cloth get fly in the air)  >  and I put some drag 0.150 > damp 0.100 (drag = reduce your energy in the air,damp  will make your cloth float in the air)

5. Collisions tab > collide strength to 0.1 ( reduce cloth collide to another)  >  thickness to 0.009 (it is thickness for your cloth collide)


6. Select your banknote model  >  Field  >  Volume Axis. I want to put some air to my bank note


7. Now this is the key for work. Magnitude 4 ( Power of Volume Axis) > attenuation 0.1 ( your volume will stop a little bit before it start) > away from center 1 ( it is force from center ) > Along Axis ( force that go along direction )
> Turbulence  0.5 (like turbulence field ) > rotate your Volume Axis and scale like image.

8. This attribute will make your cloth have force reaction to another. Go to Force Field Generation  >  Force Field  AlongNormal (force direction to along normal of surface)  >  Force Magnitude 0.5 ( power of Force Field )  >  Force distance  0.5 (distance of force start form surface)

9. Let simulation  you will got like this.

10. I have elevator in scene too.and I want it collide with banknote.but Don’t use your model because it hard for simulation try to create new model for passive and just lowpoly too.

11. I create box like image.

12. nMesh  >  create Passive Collider  your box will collide with banknote.

13. Dynamic Properties tab > Thickness 0.034

14. Run simulation now we done for animation part. But if you render now .banknote will show only front texture now we want to render two face of it and I try to use Node for render two face. it still got problem to render. But I have another way to render.

15. Open attribute editor  > outputCloth tab  >  Render Stats > check out Double sided. 

16.Now render the Banknote with this part but use blackhole shade to mask another in your scene except your banknote.

17. Render like image.back face of your banknote will got hide.

18. After finished render. we will open attribute editor > Render Stats > check Opposite > change your banknote texture to back. and Render again. 

19. until finished use composite in another program. combine it together.

20. until finished use composite in another program.


Now we done. If you have some problem with this tutorial. PM me at jebun3d@gmail.com
Sorry for any mistake. I’m try to do create it in easy way and want to share to every maya user. That have some problem form work. 
วันเสาร์ที่ 12 ตุลาคม พ.ศ. 2556

Firework Tutorial !!! The easy way to create firework particle in maya!


Firework Tutorial !!!   The easy way to create firework in maya!

          I begin to create this blog. Becuase I want to share the solution about maya dynamic that I have found during my work experience. To be honest, I know I’m not the best for maya dynamic .but I just try to do the best thing I can. Hope my tutorial can help you who want to solve work like this. However, I will not tell about the basic step of work because I think now there are a lot of tutorials that show about basic step but I need to share about the way from start to the end of work. sorry for something wrong with it because I’m not good in English
 and This is link for mov. http://youtu.be/4ZNcIYwMT80

Let Start!!!
1.create plane > scaleX 85 scaleZ 18 
I’m start the plane with wider because I want the firework start in wide area.

2.still select the plane and now go to nDynamics mode >create the new emit from object before create check obtion is Balls (step 4).

3.Now change the emitter type to surface and rate to 20 >speed 40 >speedrandom 20 > tangentspeed 0.30

4. Let play the simulation. 

5.open the Attribute Editor tab > Particle Size.> Radius change it to .030 > Shading tab.and change color to bright yellow and orange with.>color input still Randomize ID.and > particle name to Main.


6. Select Main Particle > create Nparticle > name to longtail > Rate to 400 >Maxdistance to 0.25 (Maxdistance is when particle emit it will start like mini sphere radius 0.25) >speed to 0.4 >speed random to 0.2

7. Run the simulation now will got the new particle tail like this.because the new particle still collide with itself and the Main.now we must deactivate collide for tail.

8. Open attribute editor > collisions tab> deactivate the collide and self collide

9. Lifespan tab > Lifespan Mode to Random range > lifespan 0.6 > lifespanRandom 0.3 

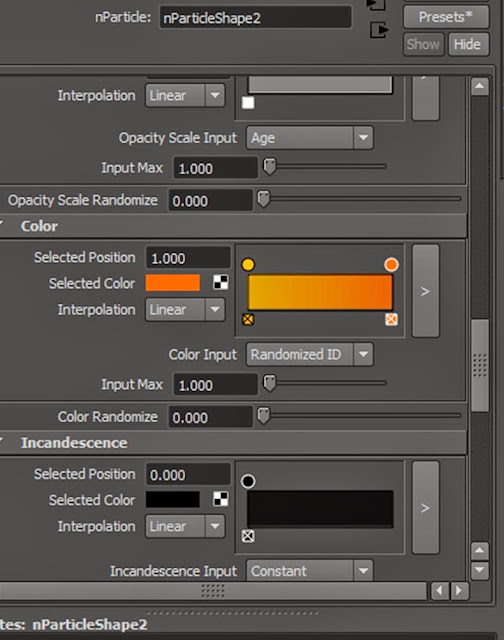
10.and I want the particle color got random with very high value in some of it. Go to shading>color tab.and click small button in picture change the color like I did. (step 2) you can change the Value with higher than 1. Now I change it to 5.
(value is in HSV box. It mean some of particle color will got very high color.)

11.test render > render option > renderer to mentalray. >quality preset to preview.> create directional light with 1.5 intensity

12.Open Hypershade > select the tail particle click(step1) > click (step 2) > blinn material tab. > special effects (step 3) >Glow intensity to 0.1

13.test render particle will glow a little bit.

14.Select the Main particle > create new Nparticle like the picture.> name to shorttail.

15. Lifespan mode to lifespan random > Lifespan 0.2 > lifespan  random 0.1. > deactivate the collide and selfcollide. >step 1 I change color like the image. >step 2 color input change to normalize age it mean when particle simulate the color ramp will be the life of particle from start to die. >step 3 shading tab > change particle type to Multistreak > step 4. Check color accum u will see the particle color looklike glow.for this step is just for check the animation of short particle.

16. step 1. > particle render type to Tube(S/W) .cause I don’t want to render multistreak in mentalray it just for check animation.> tube is looklike multistreak and so faster when rendered in mentalray.  > 2change radius1and2  to 0.030  >3.change tailsize to 0.5 >4. Go to Opacity scale tab change the ramp like image.> 5. Change opacityscale input to normalized age.

17. Incandescence tab change color like image. > first color of ramp HSV is 6  0.8  1.5 > Incandescence input to normalized age.

18. I need the shorttail looklike have speed follow Main. > Emission attributes tab > inherit factor to 0.8 (shorttail will have speed at start same Main with 80%) simulation and test render.

19. We need to explode the Main particle like it died and create the new particle that have the speed and fall similar sphere.and this part I’m try to search how to create particle after the old died.and found it isn’t easy to write the expression.but I try in other way just use the collision event and the result is fine too.then create new plane and sculpt like this. 

20. nMesh > create passivecolider > new layer > Visible

21. Run simulation 

22. select Main particle >Nparticles > step 1 particle collision event editor I it will pop the new attribute page. > 2. check emit box >3.Numparticles  to 200. > Spread  to 2 > 4.inherit velocity to 0.9 > 5. Check box original particle dies (when Main got collide it will disappear.)

23.run simulation > change name to child > deactivate collide and selfcollide.

24. lifespan to random. > lispan 1 > lifespan random 0.5
> Radius to 0.010 > ramp like image. >Radius Scale input change it to Radomized ID (particle will random the scale when start not just follow lifespan.)

25. Now child will go with full speed until it die.but I need it got a little bit slow before gone. Go to Dynamic Properties tab > Conserve down a little bit to 0.960.

26.Select child > create new emitter Name to tailchild > omni rate to 200 >Maxdistance to 0.1 >speed to 0.4 >speedrandom to 0.2 > deactivate collide and selfcollide.

27.Go back to Main particle I need to change some rate to 3 >speed 60 >speed random 40 >tangent speed 0.40

28.run simulation

29. Radius to 0.050 > radius scale like image > radius scale input to randomized ID. > lifespan mode to lifespan random >Lifespan to 0.6 >lifespan random to 0.3. > dynamic properties tab conserve to 0.950

30. shading tab > Particle render type to Tube(S/W)
>Radius0 to 0.060 >radius1 to 0.060 >tailSize to 0.8 >Opacity to 0.850 > Opacity scale ramp same image.

31. step 1 opacity randomize to 0.380 > 2. Change color like picture >3. Color randomize to 0.200 >4. Change incandescence same image. >5. Incandescence randomize to 0.400


32.runsimulation > test render.

Now we are done for this tutorial. thanks for watching it and so sorry for mistake about this tutorial. I hope to it will help who need to solve the problem like I found. I create this tutorial is not just to show off. But I really want to share my experience. please don’t steal this tutorial.